

Photographing the Milky Way
Learn how to photograph the Milky Way with Arizona photographer Rob Gallucci — expert tips on planning, gear, stacking, and tracking the night sky.
How to Photograph the Milky Way

The Milky Way rising above the Leaning Rocks in the Dragoon Mountains, just outside Tombstone in Cochise County.
There’s nothing quite like standing under an Arizona sky when the galactic core rises — no city glow, no noise, just the Milky Way stretching across the desert. It’s one of the reasons we moved here twelve years ago. And it’s why I built my three-night Erie Street Milky Way Photography Workshop in Bisbee, AZ. The city is kind enough to turn off the streetlights on Erie Street two weekends each year, giving us multiple nights to shoot, adjust, and reshoot under some of the darkest skies in the Southwest.
In this post, I’ll walk you through the same approach I teach on location — gear, planning, camera settings, and three different shooting methods you can grow into. Use this as your field guide, then come out and shoot it with me in person.

A view of the Harley Davidson and Indian storefronts on Erie Street in the hamlet of Lowell, Bisbee Arizona
1. Gear I Actually Recommend
You don’t need a truckload of gear to shoot the night sky, but the right pieces make the night go smoother.
-
Camera: A camera with excellent high-ISO performance and strong dynamic range is key for Milky Way photography. I primarily shoot with the Canon R5 and R5 II — and I shot for years with the Canon 5D IV and 5D III, which are still excellent night-sky cameras.
If you’re on Nikon, the Z9, Z8, Z7II, and D850 are outstanding astrophotography options. Sony shooters will find the A7S III, A7 IV, and A7RV are proven low-light bodies with great color and noise performance.
Whatever system you use, choose a camera that performs cleanly at ISO 6400+, offers manual focus aids, and supports uncompressed RAW for the best Milky Way results.
-
Fast wide lens: 14–24 mm at ƒ/2.8 or faster is ideal. I love the Rokinon 24 mm ƒ/1.4 for more light and cleaner skies, and the Canon RF 15–35 mm ƒ/2.8 for wide-field scenes.
If you’re using a tracker, you can get away with slower lenses like ƒ/4 because the longer exposure compensates for reduced light.
-
Tripod: Long exposures and desert breezes don’t mix. A solid tripod is essential. ProMediaGear has proven itself rock-solid through the rough Arizona Monsoon season, which is why I trust it for all my night-sky shoots where stability is critical (use code RGallucci – 10% off).
I pair it with Acratech ballheads, which are so brilliantly designed you can use them as pano and gimbal heads — and they look cool (use code RGallucci – 10% off).
-
Camera bag: For local workshops, I rely on the intelligently designed Gura Gear Kiboko 22L; for travel, nothing beats the Kiboko 30L (use code RGallucci – 10% off).
Think Tank bags are also excellent for durability and their clever layout.
Packing for travel photography is part art, part science. Would you be interested in learning how we pack all our gear for long photo trips? Let me know in the comments — it might just become a future blog post.
-
Filters: Light pollution and sky glow are constant challenges when shooting the Milky Way. A night-sky or light-pollution filter helps tremendously when shooting near towns.
Nothing beats the Breakthrough Filters Night Sky filter — I don’t shoot without it. Breakthrough now offers my students an exclusive 10% off. Contact me for details.
-
Tracker (optional): When you want to maximize the stars in your image or if you’re using a slower lens (like ƒ/4), a tracker is your solution.
We use and teach the Move Shoot Move tracker (use code RGallucci – 5% off) — an exceptional, affordable, lightweight option that our students love.
When you're ready to go deeper into the night sky and capture objects like Orion, Andromeda, or the Rosette Nebula with longer lenses, step up to the iOptron SkyGuider Pro or Sky-Watcher Star Adventurer.
Use PS Align Pro to get your polar alignment close — with a 14–24 mm lens you don’t have to be perfect, but the longer your focal length, the more precise your alignment needs to be.
We are one of the few workshops that actually teaches you how to use your tracker in the field — hands-on, under dark skies.
-
Tethering / accessories: I use Tether Tools (use code Robert10 – 10% off). For long shoots where battery life might be an issue — such as star trails or time-lapses — their power accessories keep everything running smoothly through the night.

Students planning a shot of the historic barn at Empire Ranch in southern Arizona
2. Planning Your Shoot
Milky Way photography is as much about preparation and patience as it is about taking the shot. The right tools make that planning easier.
- PhotoPills — My go-to app for planning most shoots and for visualizing Milky Way position, core rise times, and composition alignment.
- Planit Pro — Excellent for detailed location planning and elevation data. It’s also the best app for finding the exact spot you need to be when shooting moonrise shots over a city.
- Photographer’s Ephemeris — Great for understanding how the Milky Way aligns with terrain features.
- Sky Guide — Helps identify constellations, find Polaris, and visualize where the core will rise on any given night.
- PS Align Pro — Essential when using a tracker like the iOptron SkyGuider Pro or Sky-Watcher Star Adventurer — it helps lock in your polar alignment quickly and accurately.
We teach all of these apps during our workshops, so when you leave, you'll be confident in their use.

A final image of the historic barn at Empire Ranch in southern Arizona
3. Pick the Right Location
People often think Milky Way photography is all about the camera — it’s not. It’s about darkness. The darker the sky, the less work you’ll do later in post.
A small waning moon (10–15%) behind you can softly illuminate your foreground without washing out the Milky Way. Whether it’s waxing or waning doesn’t matter much — what matters is its position in the sky and that it’s behind your shooting direction, providing gentle, natural fill light.
- Look for Bortle 1–4 skies if possible.
- Face south if you’re in the U.S. — that’s where the galactic core rises.
- Use the planning apps above to track moon phase and position.
- Avoid bright moonlight; anything above ~20% can start to compete with the stars.
In Bisbee and the surrounding high desert, we’re lucky — low light pollution, high elevation, and great foregrounds. That’s why much of Cochise County, including Bisbee and the other areas where we shoot, enjoy Bortle 1–4 skies, some of the darkest and clearest in the Southwest. It’s also why I run my workshops here.

The old Greyhound bus depot and Texaco station on Erie Street in the hamlet of Lowell, Bisbee, Arizona
4. Scout a Foreground
Stars alone are pretty, but they don’t tell a story. A strong image needs a compelling foreground — something that ties the sky to Earth. Scout in daylight for safety and composition, look for silhouettes or shapes that frame the Milky Way, and keep clean horizons to make the sky pop.

Traveling back to Lowell — one of the most popular shots on Erie Street in the hamlet of Lowell, Bisbee, Arizona
5. When to Shoot
Milky Way Season: March through October.
The Milky Way’s position and visibility shift throughout the year. In the U.S. Southwest, the season typically runs from March through October, with May through August offering the best visibility of the galactic core.
- Early Season (March–April): The galactic core rises around ~1:30 AM in March and closer to ~11:35 PM in April — perfect for south-east facing compositions.
- Mid-Season (May–August): The Milky Way arches high in the southern sky, making for dramatic vertical or panoramic shots. May, June, and early July are especially good for single-row panoramas.
- Late Season (September–October): The core sets earlier in the night toward the southwest — perfect for foregrounds that catch that last light and for compositions where the Milky Way core points west across the frame.
Always check astronomical twilight — that’s when true darkness begins. If you’re scouting in the day, mark your spot and return an hour before twilight ends to set up.
6. Core Camera Settings (Single Exposure Method)
- Mode: Manual
- Aperture: ƒ/1.4–ƒ/2.8
- Shutter speed: Use the NPF Rule instead of the old 500 Rule — it’s more accurate because it accounts for pixel pitch, focal length, and aperture.
- ISO: 3200–6400
-
Focus: Getting tack-sharp stars is one of the biggest challenges new Milky Way photographers face. Most autofocus systems won’t work at all in the dark — and the few that do are inconsistent — so nailing focus becomes a manual skill. The good news? Once you learn it, it becomes second nature.
The simplest method is to switch to Live View, zoom in on a bright star, and carefully adjust your focus ring until the star is as small and crisp as possible.
There are several other reliable techniques for achieving perfect focus at night, including methods that work even when no bright star is visible. We teach all of them in our workshops so you can lock in accurate focus quickly and confidently under any sky.
-
Save your settings: Once you have your Milky Way settings dialed in, save them to a custom mode so you can get back to them instantly in the field. On Canon, that means storing them in one of the C1 / C2 / C3 modes — something I use all the time on my R5 and R5 II.
Nikon bodies offer custom U1 / U2 / U3 modes on models like the Z-series, and Sony uses Memory Recall slots on the mode dial. No matter what system you shoot, saving your night-sky setup makes it far easier to get up and running quickly in the dark.

The Milky Way rising through the opening of a natural cave used by humans for centuries in the Dragoon Mountains of southern Arizona
7. Taking It to the Next Level — The Three Shooting Methods
A) Single Exposure
Simple, one frame, NPF shutter, done.
B) Stacked Exposures
Stacking is about getting a cleaner sky without changing locations.
- How to shoot: Lock your composition and capture 10–20 identical frames using the same settings (NPF shutter, same ISO, same aperture).
- Why it works: Multiple exposures let you average out noise while keeping fine star detail. The more frames you shoot, the cleaner your sky will be — though beyond 20 offers little improvement.
- Foreground strategy: If your 10–20 frames under a new moon don’t provide enough foreground light, capture one additional frame using Long Exposure Noise Reduction (LENR), light painting, or both.
C) Tracked Exposures
Use the Move Shoot Move tracker (code RGallucci – 5% off). When you’re ready to go deeper into the night sky and capture objects like Orion, Andromeda, or the Rosette Nebula, step up to the iOptron SkyGuider Pro or Sky-Watcher Star Adventurer. Because the tracker follows the stars, shoot your foreground first, then move to a flat, unobstructed horizon for the tracked sky. That’s exactly how we shoot a lot of our favorite locations — one clean foreground and one perfect Milky Way sky — and blend them later.

A rare field of late-season wildflowers in the Chiricahua Mountains of Cochise County, southern Arizona
8. Putting It All Together
- Scout your location in advance.
- Use PhotoPills or Planit Pro to check alignment and moon phase.
- Save your plan.
- Arrive before dark to compose.
- Check the moon.
- Capture a high-ISO test shot.
- Shoot your single exposure or stacked series.
- If tracking, shoot the foreground first, then the tracked sky.
- Blend your sky and foreground in post.
9. The Darkest Skies of the 2026 Milky Way Season
To capture the Milky Way at its best, aim for nights around the new moon — when the moon does not rise above the horizon. These are your optimal dark-sky windows:
| Month | New Moon | Best Dates to Shoot |
|---|---|---|
| March | 18 | 16–20 |
| April | 17 | 15–19 |
| May | 16 | 14–18 |
| June | 14 | 12–16 |
| July | 14 | 12–16 |
| August | 12 | 10–14 |
| September | 10 | 8–12 |
| October | 10 | 8–12 |
Tip: Aim for nights around the new moon when the moon stays below the horizon.
10. Recommended Gear Partners
These are the trusted brands and tools I use personally in the field and recommend to all my workshop participants. Each one has earned its place through real-world performance under the Arizona night sky.
- Tripods: ProMediaGear — use code RGallucci for 10% off
- Filters: Breakthrough Filters — use code RGallucci for 10% off
- Trackers: Move Shoot Move — use code RGallucci for 5% off
- Ballheads: Acratech Ballheads — use code RGallucci for 10% off
- Bags: Gura Gear — the Kiboko 22L is my daily bag for everything — use code RGallucci for 10% off
- Power / Accessories: Tether Tools — use code Robert10 for 10% off

Students from a recent workshop on Erie Street in the hamlet of Lowell, Bisbee, Arizona
11. Join Me in Bisbee
Every year, I lead small-group Milky Way Photography Workshops in Bisbee, Arizona — under some of the darkest skies in the Southwest. You’ll learn how to plan, shoot, and process your own stunning Milky Way images over three unforgettable nights.

Saving the Stars
If you walk outside tonight and look up, how many stars can you see?
For many of us, the answer is “not many.” The Milky Way, once a brilliant ribbon stretching from horizon to horizon, is now invisible to more than 80% of Americans. What was once a shared experience of awe and wonder has been diminished by the glare of poorly designed outdoor lighting. But it doesn’t have to be this way.
Dark sky policies are not about turning off the lights. They’re about turning them the right way, using the right amount of light, only when and where it’s needed. Communities that adopt these policies gain more than just beautiful night skies. They protect wildlife, improve public health, save money, and reconnect people with something deeply human: the stars.
Why Towns Should Adopt Dark Sky Policies

If you walk outside tonight and look up, how many stars can you see?
For many of us, the answer is “not many.” The Milky Way, once a brilliant ribbon stretching from horizon to horizon, is now invisible to more than 80% of Americans. What was once a shared experience of awe and wonder has been diminished by the glare of poorly designed outdoor lighting. But it doesn’t have to be this way.
Dark sky policies are not about turning off the lights. They’re about turning them the right way, using the right amount of light, only when and where it’s needed. Communities that adopt these policies gain more than just beautiful night skies. They protect wildlife, improve public health, save money, and reconnect people with something deeply human: the stars.
What Are Dark Sky Policies?
At their core, dark sky policies are local regulations that reduce light pollution. That includes things like:
Requiring shielded fixtures that point light downward
Limiting excessive brightness (especially from commercial or decorative lighting)
Favoring warm-colored LEDs over harsh blue-white ones
Setting curfews for unnecessary lights
Encouraging motion sensors or timers
These policies are often informed by guidance from the International Dark-Sky Association (IDA), a nonprofit organization that also designates Dark Sky Parks, Reserves, and Communities worldwide.

Why It Matters
A Cultural Connection Worth Preserving
For millennia, humans looked to the stars for guidance, inspiration, and meaning. Whether it was the Polynesians navigating vast oceans or Galileo charting the heavens, the night sky shaped who we are.
Light pollution severs that connection. Kids growing up today may never see the Milky Way. Without action, we risk becoming the first civilization in history to forget what a star-filled sky looks like.
I’m reminded of the first time we turned the lights off on Erie Street in Lowell to see the Milky Way aligned over the street. Residents who have lived there for decades came onto the street and stared, awe-struck, at the night sky. One long-time resident came to me with tears in her eyes, saying she never realized the Milky Way was so beautiful.

Wildlife Needs the Dark
Many species rely on natural darkness to hunt, migrate, or reproduce. Birds become disoriented by lit-up skylines. Sea turtles crawl toward parking lots instead of the ocean. Even insects, pollinators critical to our food supply, are dying by the billions around streetlamps. In Cochise County, the threat to wildlife is directly connected to the reason we live here.
A large part of Arizona’s beauty and uniqueness is the incredible number of cactus and succulent species, including the iconic Saguaro Cactus. Saguaro, hearty and fragile at the same time, live for hundreds of years, and when one is lost, it is an eraser of centuries. But did you know that it is the Long-Nose Bats that migrate from Mexico to the US that pollinate the Saguaro, as well as the Organ Pipe Cactus and Agaves? Light pollution disrupts the bats’ migration corridors and stifles the start of their flights, affecting the saguaro's health. The bats are also crucial in controlling insect populations.
A single unshielded light fixture might seem harmless. But multiply that by every home, business, and streetlight in a town, and you’ve got a massive ecological disruption.

Light Pollution Affects Human Health, Too
Our bodies are designed to follow natural light cycles. Artificial light at night can throw off circadian rhythms, reduce melatonin production, and contribute to insomnia, anxiety, and even chronic disease.
Warm, targeted, and timed lighting solutions protect health without compromising safety.
Safety and Visibility Improve With Smarter Lighting
Here’s the surprising part: more light doesn’t mean more safety.
Overly bright lights create glare, deep shadows, and visual discomfort. Properly shielded, softer lighting actually improves visibility and helps people feel safer.
Law enforcement agencies and urban planners are increasingly recognizing that thoughtful lighting design is more effective than simply adding more lighting.

It’s Good for Business and the Bottom Line
Efficient lighting reduces energy use and utility costs. But there’s another bonus: astrotourism. People are traveling specifically to see dark skies. Places like Flagstaff, Arizona, Torrey, Utah, and Dripping Springs, Texas have built reputations (and revenue) around their commitment to darkness.
Bisbee, Arizona, recently designated a Dark Sky Community by the International Dark-Sky Association, is a prime example. The city has leveraged its location near some of the darkest skies in the Southwest, collaborating with residents and business owners to minimize light pollution while preserving Bisbee’s vibrant, artistic charm. The result? Not only are the stars back, but the town now markets itself as a dark sky destination, attracting photographers, stargazers, and nature lovers alike.
Your town doesn’t need to be remote to benefit; it just needs to be responsible.
A Case Study: Cochise County’s Sky, From Pristine to Polluted

Cochise County, Arizona, is a photographer’s dream when it comes to dark skies, and a cautionary tale for what happens without consistent policy.
To understand just how much light pollution can vary, even within a single county, it helps to know about the Bortle scale. Developed by astronomer John E. Bortle, this system rates night sky darkness from Class 1 (pristine, darkest skies) to Class 9 (inner-city glow). Under Bortle 1 skies, thousands of stars are visible, the Milky Way casts shadows, and deep-sky objects can be seen with the naked eye. By contrast, Bortle 9 skies might reveal only the moon, a few planets, and a handful of the brightest stars.
Some of the darkest skies in North America can still be found here in Cochise County. Areas near the Chiricahua Mountains, Portal, and stretches of the San Pedro Valley reach Bortle Class 1, offering skies that most Americans have never experienced. Under these conditions, the Milky Way isn’t just a vague stripe; it’s a brilliant, textured arch.
But just 60 miles west as the crow flies, or 85 miles by road, you reach Sierra Vista, a growing city rated Bortle 5 or worse. The city’s unshielded lighting, expanding development, and lack of lighting policy have created a dome of skyglow visible from far beyond its borders. Even locations that once offered excellent viewing are now compromised.
This dramatic contrast in sky quality within a single county makes Cochise a perfect case study. It shows what we stand to lose, and what’s still possible to protect. With thoughtful lighting ordinances and community education, Cochise County could become a national model, striking a balance between development and preservation.
Success Stories
Flagstaff became the world’s first Dark Sky City back in 2001. Since then, dozens of towns across the U.S. and beyond have followed suit, often with help from residents, astronomers, nature enthusiasts, hunters, and photographers.
Closer to home, Bisbee, Arizona, earned its designation as a Dark Sky Community in 2023 after a grassroots effort involving residents, local government, and conservationists. The city updated its lighting ordinance, hosted public education events, and retrofitted problematic fixtures. It now joins a growing movement of towns proving that light pollution can be reversed with collaboration and vision.
Common Concerns (and the Real Answers)
"It's too expensive to change everything."
Most upgrades pay for themselves in energy savings. Retrofit programs and grants are also available.
"It’s a safety risk to turn off the lights."
Actually, glare and overlighting often reduce visibility and make it harder to detect threats.
"People won’t support it."
In many towns, education and simple demonstration projects are enough to gain public support, especially when folks see the stars again.
How to Take Action
Start by evaluating your own home lighting. Are your fixtures shielded? Are your bulbs warm in color?
Attend or speak at town council meetings.
Encourage local governments to adopt lighting ordinances based on IDA guidelines.
Host or participate in star parties and public outreach events.
Partner with local schools, parks, or businesses to promote the value of a visible night sky.
Conclusion: A Sky Worth Saving

We’ve protected rivers, forests, and mountains, but the stars need saving, too. A night sky filled with stars should never be a rarity. It’s a shared heritage, a scientific treasure, and a source of inspiration we cannot afford to lose.
By adopting dark sky policies, towns don’t go dark. They shine smarter.
Let’s not be the generation that forgot the stars.
If you liked this post check out my night sky workshops here: 2026 Erie Street Milky Way
How to Photograph Lightning
A Storm Chaser’s Guide to Capturing Nature’s Power in Southern Arizona
A Storm Chaser’s Guide to Capturing Nature’s Power in Southern Arizona

Lightning is one of nature's most spectacular and elusive phenomena, and capturing it with a camera takes more than pointing at the sky and hoping for the best. It requires patience, technical skill, meteorological awareness, and deep respect for the storm's power. As storm chasers and photographers working across Southern Arizona and into New Mexico, we've learned that success comes from planning, preparation, and making deliberate decisions in the field. This guide walks you through our approach to safety, forecasting, camera setup, and location so you can chase with confidence and come home with images that electrify.
In Southern Arizona and New Mexico, the monsoon typically runs from mid-June through late September. This is when we see the highest concentration of convection-driven storms and lightning activity, with peak months in July and August.

Lightning Safety in the Field
Before we discuss gear, forecasts, or camera settings, safety must be our top priority. Lightning is dangerous—each year claiming the lives of some in the US. Your safety is our number one priority.
We avoid setting up on ridgelines, near isolated trees, or in open fields where we’d be the tallest object. We also stay away from fences, power lines, metal structures, and anything conductive. Using the flash-to-bang method—counting the seconds between lightning and thunder—and modern radar apps helps us gauge distance. Every five seconds equals roughly one mile. If strikes are hitting within two to three miles, it’s time to reevaluate. We also watch for anvil crawlers and positive strikes, which can travel ten or more miles from the storm core, even under clear skies.
Because we often shoot without the protection of permanent shelter, we always remain close to our chase vehicles, plan escape routes, and stay aware. The storm doesn’t care about our composition. Getting the shot matters—but not more than staying safe.

Storm Chasing:
Planning the Intercept
Chasing lightning starts long before the storm appears. The best images are captured by getting into position before convection begins, and that starts with careful forecasting. In our workshop’s class sessions, we teach our students how to use forecasting tools and reinforce the learning in the chase vehicles while en route to the storms.
We begin by comparing weather forecast models, looking at when they align. That is a strong indicator of storm initiation zones. The University of Arizona's high-resolution WRF model is particularly valuable for capturing the local terrain's influence during the monsoon. We also use Pivotal Weather for quick model overlays, the Storm Prediction Center for outlooks and mesoscale discussions, and the College of DuPage’s Nexlab site for satellite and radar composites. Once storms initiate, we switch to Radar Omega, Radarscope, SatSquatch WX, and Pivotal Weather to track real-time movement, structure, and lightning activity.
But no matter how good the models are, they’re still forecasts, not guarantees. One of the most important tools we have is our own eyes. Being able to read clouds in the field—watching for signs of vertical growth, rotation, outflows, or collapsing towers—can reveal dynamics that radar hasn't yet caught.
I’ve been told that one of my strengths as a storm chaser is my ability to read the weather in real time. I remember a chase where every radar model pointed northwest, but when I stepped outside, I saw an enormous tower building to the east, entirely off the radar's focus. I followed my instincts instead of the models, and it turned into one of the best storms of the season.
Forecasting helps us choose a target region—but selecting the best location within that region is what separates snapshots from portfolio shots. That's where the creative payoff really happens—where the light, the land, and the atmosphere align to turn weather into art. An exceptional Arizona storm chaser puts it, "Planning gets us to the stadium—next, we need to find our seat." That seat is where the angle, the structure, the light, and the landscape all come together.
Choosing Your Location:
Landscape, Line of Sight, and Lightning Potential
The bolt may be the subject, but the foreground makes the photo. We’ve scouted and marked over 500 storm-shooting locations across Cochise, Pima, and Santa Cruz counties in Southern Arizona and southern New Mexico near the Arizona border. These aren’t just pretty places—they’re high-probability setups where we’ve learned how storms behave, where bolts land, and how light plays across the land.
During monsoon season, southerly to southeasterly flow brings moist air from the Gulf of California and eastern Pacific into the region, often leading to storm development just north of the U.S.–Mexico border. As a result, Cochise County consistently records more lightning strikes than any other county in Arizona.
One of the biggest drivers of storm formation here is the orographic lift from the Sky Island mountain ranges—the Huachucas, Chiricahuas, and Santa Ritas. A familiar and fascinating sight during monsoon season is the appearance of small clouds over these mountains by late morning. These early-stage formations often build into moisture-rich cumulonimbus clouds by early afternoon, signaling the onset of storm development. These mountain-driven storms frequently form in the early afternoon and can persist well into the night.
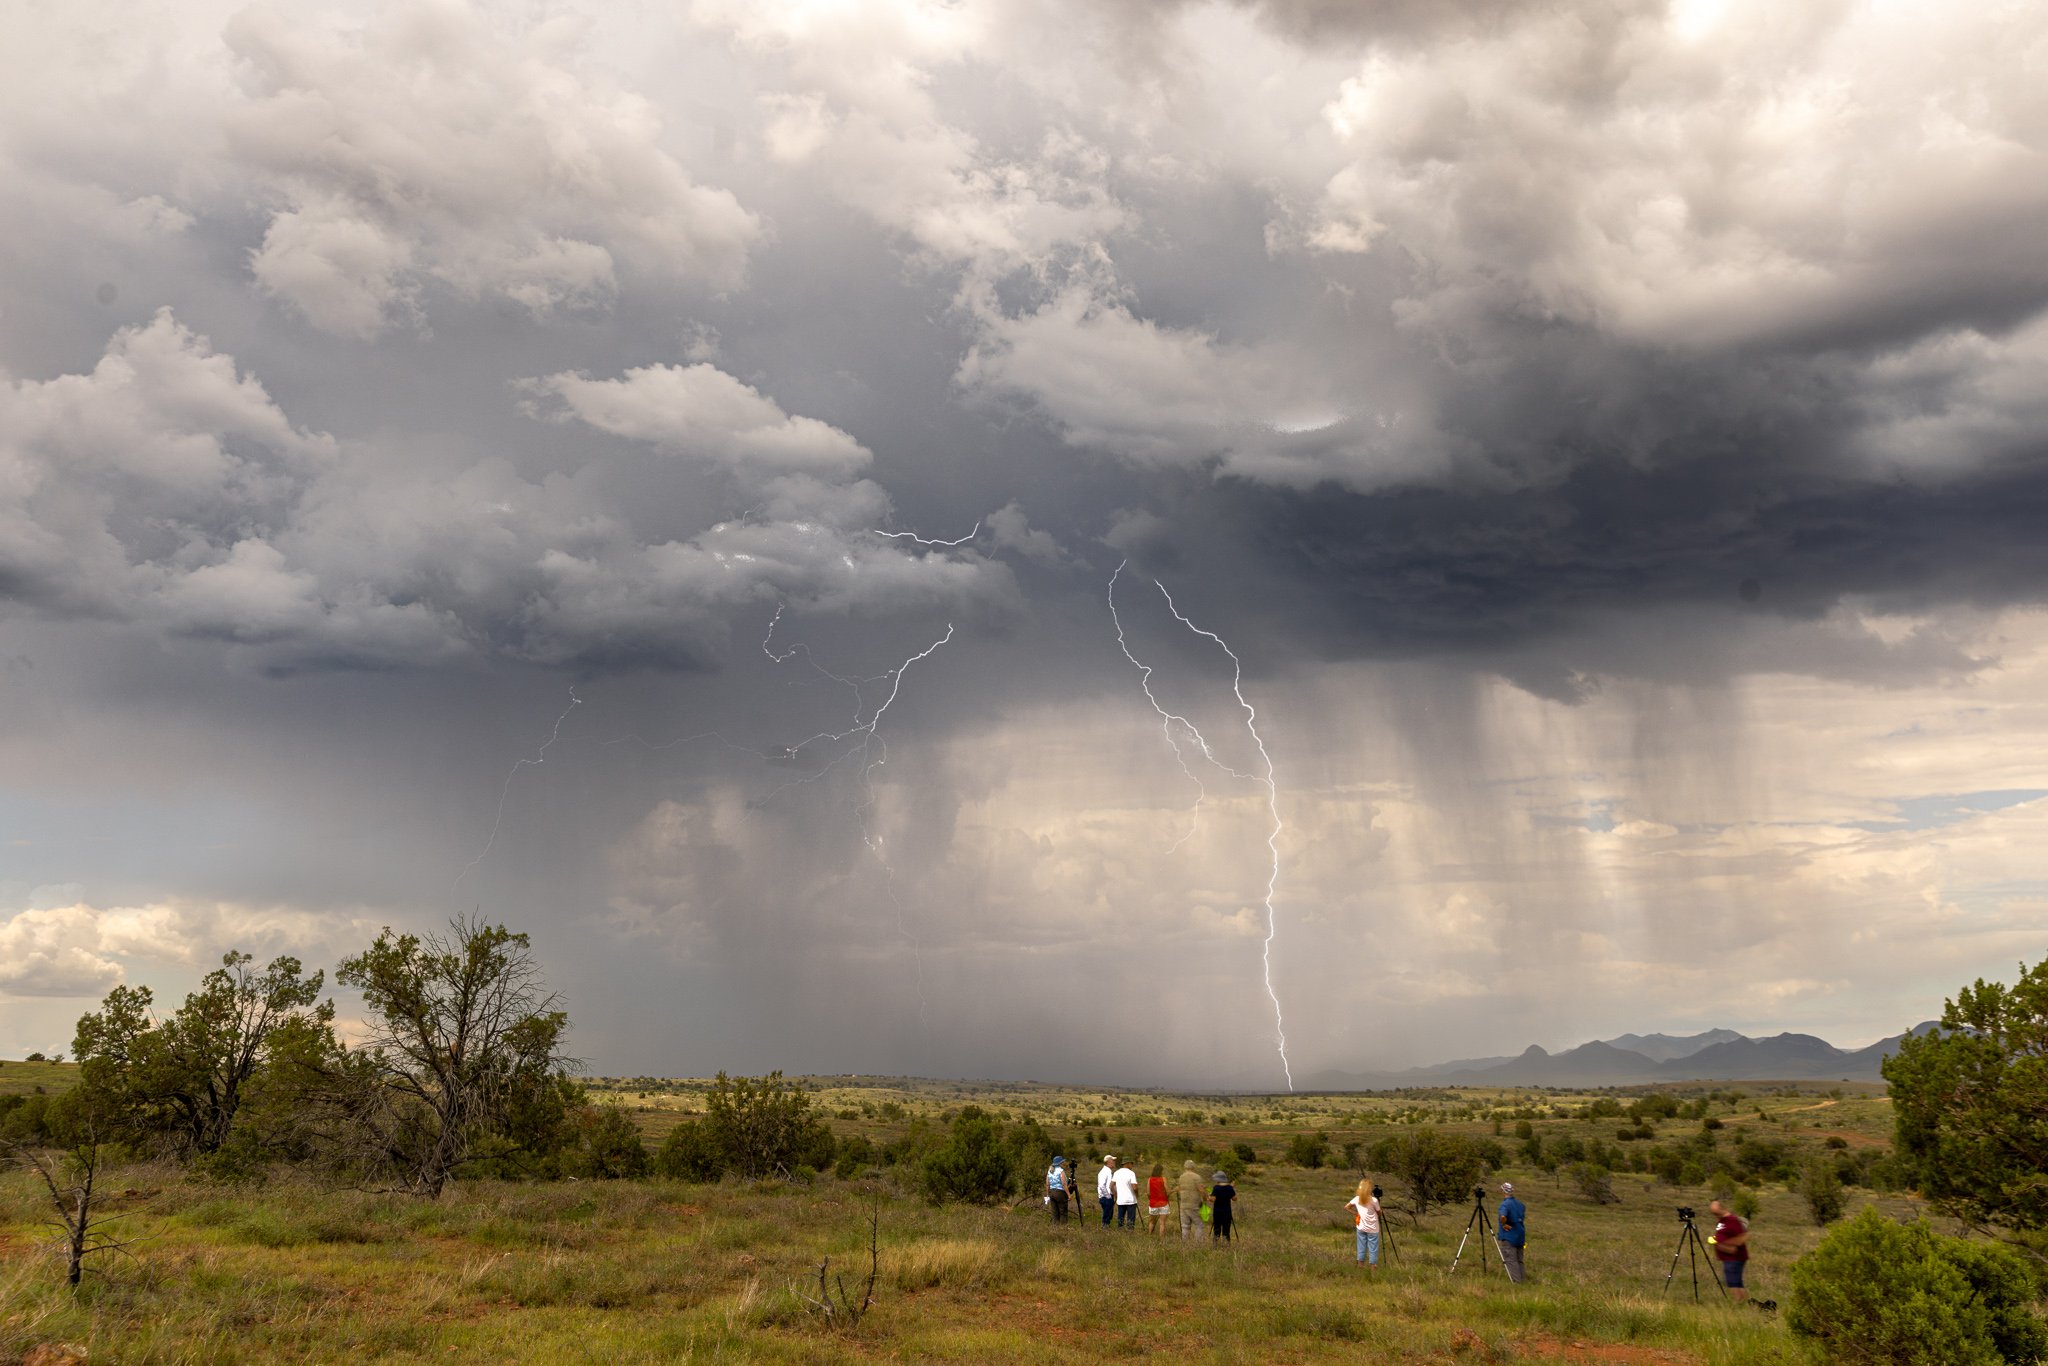
When selecting a shooting location, we look for clean views toward where storms usually approach, as well as strong compositional elements such as saguaros, ridgelines, old ranch fences, or lone trees. Open landscapes are great for structure, but without foreground context, even a dramatic bolt can fall flat. Many of our best locations also offer room to reposition as storms evolve. We favor sites with 180- to 360-degree views when possible, allowing us to adjust quickly if multiple storm cells develop or shift unexpectedly.
And we don’t just choose spots based on the view—we choose them based on storm behavior. Some locations are known to produce lightning-heavy storms with frequent cloud-to-ground (CG) strikes. Understanding those dynamics helps us get into the right place more quickly and stay productive for longer.
Some compositional thoughts to keep in mind. Some bolts are vertical, others sprawl horizontally. Anticipate the direction of structure, and leave negative space accordingly. Wide compositions with sky-dominant framing often outperform tight crops, especially when lightning strikes outside the center.

Camera Settings and Shooting Techniques
Settings vary by time of day and storm intensity, but our approach stays consistent. Here are some things we have learned the hard way. Always make sure that Long Exposure Noise Reduction is off. Double-check that you do not have a timed delay enabled. Turn off image review. We know you want to check if you captured the shot (chimping) - don't! I explain why below.
The settings suggested below are accurate starting points. As with all photography, field conditions will require needed adjustments.

Daytime
For daytime lightning, you will need a lightning trigger. This device is sensitive to the infrared change that occurs before a strike becomes visible, triggering your shutter. The goal in shooting in bright ambient light is to find the proper balance between the landscape exposure and capturing a strong lightning strike. Here is the strategy that works for us.
We set up in manual mode at ISO 50, f/8, and shutter speeds between 1/15 and 1/4 second and adjust from there. These slower exposures increase the chance that the shutter is open when the Lightning Bug Plus Lightning trigger fires, allowing the camera to capture the bolt while maintaining proper exposure. When using a lightning trigger, the camera operates in single-shot mode, not continuous or interval shooting. We focus once using autofocus, then switch to manual to avoid lens hunting. We shoot in RAW and disable in-camera noise reduction. Depending on conditions, we use anything from a Circular Polarizer to a 3-stop ND filter to help achieve slower shutter speeds.

Sunset
When the daylight begins to fade is the most magical time to shoot storms. The golden hour in Arizona offers a rich saturation of purple to orange hues in the sky, making lightning strikes and storm structure stand out.
At sunset, we shift to aperture priority mode. Our filters are removed, and we set the aperture to f/11 and the ISO to 50, allowing the camera to determine an exposure between 2 and 4 seconds. We adjust the aperture until we get to the 2 to 4-second goal. This gives us a good dynamic range—detail in the clouds, and enough ambient light in the landscape to capture Arizona's stunning sunset colors, as well as visibility in the bolts.

Night Lightning
If your goal is to capture powerful multiple strikes with many step leaders as the primary focus, then nighttime is the best time to shoot.
As the sky transitions from sunset to night, light conditions change rapidly, requiring closer attention to camera settings and frequent adjustments. When night falls, we return to manual mode, working at ISO 200 to 400, f/8, and 10-second exposures. We try not to exceed 15 seconds, as longer exposures tend to introduce too much ambient haze, softening the bolts. After years of experimentation, we can confidently say that shooting with an interval timer or a lightning trigger at night yields similar results. Our personal choice is to use an intervalometer at night. Digital film is cheap, and culling night images is quick.
Sprites and Transient Luminous Events (TLEs)
Sprites, blue jets, and other transient luminous events (TLEs) are rare plasma discharges that occur high above thunderclouds. While they are triggered by powerful cloud-to-ground lightning, they are a distinct phenomenon from traditional lightning strikes. Sprites, the most commonly photographed, appear as brief reddish-orange tendrils or columns shooting upward into the mesosphere.
To photograph sprites, we shoot in continuous mode with four or 5-second exposures at ISO between 1250 and 4000 and f1.4 or f/1.8. The lens choice depends on the distance to the storm, typically 24mm or 50mm. A fast, wide-angle lens and a sturdy tripod are key. Sprites are best captured by pointing the camera toward active lightning storms located 100 to 300 miles away, with a clear, dark horizon.
Being based near the U.S.–Mexico border gives us an advantage: we often have a clear line of sight to powerful storms in northern Mexico. These distant systems can generate strong positive lightning strikes that trigger sprites, making southern Arizona and New Mexico prime territory for observing and photographing this rare phenomenon.
Active Conditions
In active conditions, we often run two or more cameras, intending to capture wide shots for structure and tighter images for bolt detail. This expands coverage, increases the hit rate, and provides a richer visual narrative of the storm.

A Note about Chimping
It is natural to check to see if you captured that amazing lightning strike. We strongly suggest that you resist the temptation. You never know when the next strike will happen, and Murphy has assured us that it will strike while you are checking your images. Also, many strikes will not be visible on your LCD but will be easily viewed on your computer. If you must check, then
· Use 10x zoom to check the sharpness of distant bolts.
· Look for faint branches that are often invisible in LCD previews.
· Turn off image review delay if using continuous or interval shooting.

Camera Presets for Fast Field Work
Most modern cameras from Canon, Sony, and Nikon allow users to create and save custom shooting presets. Many models allow you to save presets to an SD card, enabling photographers to preload their presets for various scenarios. These presets make it easy to quickly switch between settings tailored for separate situations, such as storms, landscapes, night scenes, or wildlife photography. Saving presets to an SD card also enables backup and rapid deployment across multiple camera bodies. This flexibility is a powerful asset when light changes rapidly in the field.
To stay efficient in changing light, we rely on custom shooting presets. On Canon cameras, we set C1 for daytime lightning: manual mode, ISO 50, f/8, 1/20 second. C2 is optimized for sunset: aperture priority, ISO 50, f/11, and variable shutter. C3 is for nighttime: manual mode, ISO 200-400, f/8, 10 seconds.
Having presets locked in allows us to adapt quickly when storms fire up. When lightning becomes frequent, we often switch to continuous mode or interval shooting to maximize our chances of capturing the moment. With bolts firing every few seconds, the best strategy is to keep the cameras rolling.

Gear and Filter Choices
Lightning photography doesn’t require the most exotic equipment, but it does demand reliability and responsiveness. Here is an overview of our suggestions. We list more specific gear recommendations in the summary at the end of this article.
Mirrorless cameras are generally preferred for lightning photography due to their fast sensor readouts, higher sensitivity, and near-instant electronic shutter response. These advantages improve the odds of capturing split-second lightning strikes, especially when using a trigger. That said, any good DSLR can still perform well with the proper setup.
Based on our preferred location from the storms, we typically shoot with a 24–70mm or 24–105mm lens for flexibility, and keep a 50mm prime on our second camera. We also always have a 70–200mm lens to get tight shots of the storm and a 16–35mm for wider shots or when the storm is closer. A heavy-duty tripod is essential to manage wind gusts. For daytime lightning, we use the MK Controls Lightning Bug Plus trigger. It reacts quickly and significantly improves bolt-capture success. The Lightning Bug Plus detects the invisible infrared burst that occurs just before a lightning strike, triggering the shutter in time to capture the visible bolt. At night, we rely on a remote shutter release or intervalometer to enable continuous shooting and minimize vibration during exposures.
For daytime shooting, we typically use a 3-stop ND filter or a Circular Polarizer. If needed, we will use a 6-stop ND filter, understanding that heavier NDs may darken the ambient light too much and can cause lightning to fade in the exposure. A circular polarizer is a good first choice to cut glare and deepen skies while preserving bolt clarity.
Rain and wind are both a part of monsoon storms. While we make every attempt to stay dry, we will inevitably get wet and face powerful outflow winds. It is important to:
· Always carry lens cloths, a rain cover, or a shower cap for the camera.
· Know how to stabilize a tripod against gusts (e.g., low stance, hang weight).
· Consider protective sleeves for lenses.

Final Thoughts
One of the most rewarding aspects of storm chasing in southern Arizona is the sense of community. The network of chasers here is tight-knit, supportive, and generous with their knowledge. Social Media groups, such as the Official Tucson Storm Chasers, promote a spirit of learning and support for one another. We've all learned from each other—and continue to. While many of us run workshops during monsoon season, it's only right to acknowledge those whose experience, insight, and encouragement have shaped how we chase and shoot. We're especially grateful to giants in the field, Lori Grace Bailey, John (Flano) Flanagan, Greg McCown, and John Sirlin—not just for what they’ve taught, but for how they represent the spirit of the storm chasing community.
Lightning photography is part science, part instinct, and part adrenaline rush. It demands planning, patience, and humility in the face of nature’s unpredictability. Every storm is different. Every bolt is unique. And every image is a story waiting to be told.
With the right tools, solid forecasting habits, a deep understanding of terrain, and respect for the atmosphere, we can consistently put ourselves in the best position to capture something extraordinary.
We may photograph from public roads or with private landowner permission. Please always remember that respect for property, ranches, and local communities is key to keeping this craft sustainable and welcome.
So chase smart. Compose with purpose. And when the sky lights up and the shutter clicks, be ready to capture something unforgettable.
If you found this article helpful and want to take your skills to the next level, we'd love to have you join one of our monsoon storm photography workshops.
Gear Summary
We have affiliate relationships with some of the companies on this page
Cameras
· DSLR or mirrorless camera with manual mode capability (We use Canon R5 as primary, 5DIV as secondary, and 5DIII for third and fourth bodies)
Lenses
· 24–70mm or 24–105mm (primary lens)
· 50mm prime (secondary lens, second camera, Sprites)
· 70–200mm (tight storm shots and night)
· 16–35mm (wide compositions and close-range storms)
· 24mm prime (Sprites)
Tripods
· Heavy-duty tripod (We use Pro Media Gear. Use code Father10 for 10% off)
Pro Media Gear has distinguished itself with intelligent design and rock-solid craftsmanship. From their revolutionary and smartly designed L Brackets to their Gimbal Heads and Tripods, we have found them to exceed all our expectations.
Cable Releases and Intervelometers
· Remote shutter release or intervalometer (We use Vello)
Filters
We strongly recommend Breakthrough Filters (contact me for a 10% discount)
Breakthrough is set to release magnetic filters in mid-July 2025. Any filters purchased before then will be upgraded at no charge
· 3 or 6-stop neutral density filter
· Circular polarizer
Lightning Trigger
We have done extensive testing on the most popular lightning triggers on the market. The winners are the Lightning Bug Plus and Stepping Stones Lightning Trigger IV. However, the Lightning Bug Plus is half the price and comes with the cable.
· MK Controls Lightning Bug Plus (Use code RGallucci at checkout for free shipping)
Camera Bags
· Gura Gear (Use Code RGallucci for 10% off)
We love using best-in-class equipment and have found that the initial investment pays dividends through quality workmanship and intelligent design. The Kiboko 2.0 22L with its simple access and ample gear protection is our daily bag. When we need to bring our long lens into the field, we move to the 30L, the only bag in the market to handle an 800mm 5.6 lens.
Weather Tools and Forecasting Resources
Mobile Tools
· RadarScope
· Radar Omega
· SatSquatch
· WX
· Pivotal Weather
Desktop Tools
· Pivotal Weather
· University of Arizona WRF Model
· NOAA Storm Prediction Center
· College of DuPage Nexlab (Satellite, Radar, and Forecast Tools)
· HRRR and NAM3K forecast models
· RadarScope
· Radar Omega